Search

Sunday, April 29, 2018

Maya Pants -Free pattern form Designer Stitch


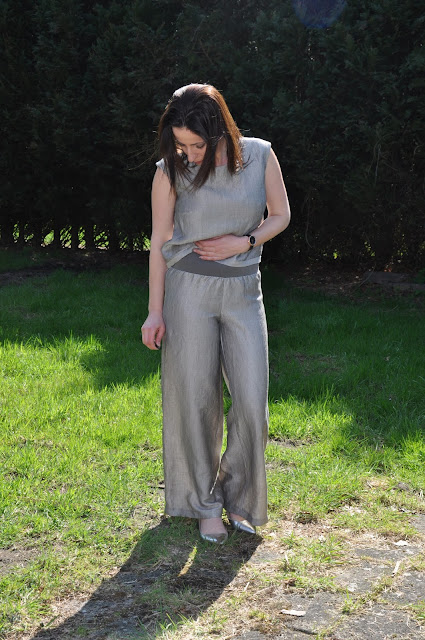
A new pattern from Designer Stitch , the Maya pants (aff)! I made two of them. This one is made in a beautifully crushed viscose blend, the photos are not showing the right color and that is a shame.
The pattern has a knit yoga waistband and for this version of my Maya pants I used a piece of poly knit that had the "right" color to go with my other fabric .


These pants are really comfortable, very easy to make and wear! I made a size 2 and made no alteration. I also added the back pockets in this version.


I just love the metallic look of this fabric, without being shiny, very strange :) 


For the top I used the bodice of the Kate Tea dress, the box top option actually. I wanted to just cover the waistband of my pants, but I guess I did not measure good enough so I had to add a strip of fabric, I like it!


This was the first version I made, in a medium viscose . This has a great drape and it was perfect for the pattern. The waistband is made with black ponti knit. 


There is also elastic sewn in the waistband, where it gets attached to the pants, and that keeps the pants perfect in place.


If you want to make a pair of super comfortable Maya pants ( aff), you can get the pattern free by joining the Designer Stitch Pattern support group on Facebook. There you will find the code the make the pattern free in the shop! Happy sewing! 

Thursday, April 26, 2018

Giverny Dress-Itch to Stitch new PDF pattern


I am sewing for spring but I am still stuck in my winterwear, with 8 degrees outside I really can`t enjoy my pretty spring dresses.  But of course, I can sew them to be prepared :)) The latest make is the new pattern from Itch to Stitch , the Giverny dress.


The pattern has a lot of nice details: jewel neckline with center front slit and button closure, pintucks front, curved high waistband, seven-panel flare skirt, in-seam pockets and the dress can be completely lined. As most of the Itch to Stitch patterns, also this one has cup sizing.


I made my Giverny dress in size 4C , well I started with 4C and made a muslin. Based on my muslin I kept the 4C for the upper bodice and blending to size 2 for the waist/waistband and the skirt. I moved the dart point by 1.5cm and made my usual swayback adjustment of 1.5 cm. 
The fabric is a printed viscose and the dress is lined with cotton. The sleeves are not lined. I used the 3/4 sleeve length but there is also the option for short sleeves.


Being lined, the dress looks very neat from inside. I did not line the sleeves, so to make the armholes looking neat I used some bias strips to finish them up. The front slit is finished with a cut on facing that makes it very easy to make and to get a neat result. 


I love the pintucks on the front, the fabric was pretty stable so it was easy to sew them up. I made a small clip on every line of the pintucks, pressed them and then 3mm away from the fold sewn. To make that accurate I use the marks on my standard presser foot on my machine. Very easy! 


The back has princess seams and the sash is attached to the waistband at the side back seams. Also, there is an invisible back zipper. When I started on the muslin of this dress, I was unsure about the fabric I was going to use so to be sure I have the good color I ordered a bunch of colors :)) and of course I did not have the perfect color but this one is pretty close, and being invisible helps too :) 
I use these invisible zippers   (no affiliate), less than €1  but very nice quality. 


The pattern is not difficult, the instructions are really good and easy to follow but you should take in consideration that there are a lot of pieces and also because it is lined it takes a bit of time to finish, so no instant gratification here but you do get a beautiful dress after all that work:) 


Another dress in my closet and 3m of viscose and 2 of cotton out of my stash :). 
The Giverny dress is for a limited time on sale on the Itch to Stitch webshop. 

PS. Next blog post it is going to be about a free pattern from another designer  I love :)


*This post contains affiliate links


Saturday, April 7, 2018

Designer Stitch Kate Dresses


Pretty dresses! Who doesn`t like to sew pretty dresses! After making a few pairs of jeans I was really in the mood to sew some prints, so the new pattern on the test drive from  Designer Stitch came at the perfect time. The Kate Tea Dress was originally only the dress option but during the discussions on the testers group Ann, the designer decided to add a few options more, I love options on a pattern, always extra value. 

The original design had a circle skirt option, so to make it possible to use a border print, Ann Grose, added a gathered skirt option and from there also an option for to make the top only and a waistband to make a skirt only.

For the version above, I used a stretch cotton with a border print. The pattern has cup sizes so I started with size 3C. I made my muslin out of the same fabric because I wanted to be sure of the fit. Based on the fit of muslin I made a few changes: I kept the bust area as size 3 but at the shoulders, neck and the waist I went with size 2. I also made a swayback adjustment of 1.5cm and took out 1-1.5 cm at the CB at the zipper from the neck down tapering to nothing. In the black/white version, I also lowered the armhole by 1cm, much better than the other two versions. 


Also in my muslin, I had some extra fabric under my bust and an easy fix for that was to sew the waist darts a bit rounded to contour my body better, that worked perfectly!


After getting the fit right it is just a matter of sewing! So I made a total of 3 dresses,:), enjoy sewing, you know :)).  This dress is made of a cotton sateen stretch, and that bit of a stretch in all the fabrics I used makes the dresses really comfy and nice to wear too. I messed up a bit with the skirt on this one. I wanted the circle skirt option and after I cut my bodice I realized that the pattern was not fitting on my skirt, it was better to cut on the crosswise grain, I think, but I thought I will do something to fit it on my fabric on the lengthwise grain. Yeah...that was a bad idea and I had to adjust it back and now I have a kind of A-line(-ish) shape skirt, which I kind of like :))

 And the back :)


I added pockets only in my gathered skirt version. Also in this version, I took my time matching the print at the zipper, it was worth it.


I enjoyed sewing all the invisible zippers in this dresses and a few things I always do when sewing invisible zippers are: interfacing the area where the zipper is going to be placed, I sew first the zipper with a regular zipper foot to have it secure and after that I sew one time more with the invisible zipper foot. It works great every time. 


How pretty, all lined up! :))


This version is made out of a cotton stretch, and here I had to cut the skirt on crosswise grain and I let it a few days on my mannequin before I hemmed it.  


Of course, the twirl pictures that you must make every time you sew a circle skirt :))))


I sew this version so fast, in one evening, so to give it a bit extra attention I sewed the hem by hand...that is for me extra attention :))), also I could not decide on the thread color :)) so like this, is invisible.


So, happy me, three dresses in my closet and three fabrics out of the stash and again a well fitting pattern, all good things!

Kate tea dress is now available at ............. and for a limited time on sale! 


*This post contains affiliate links