Search

Showing posts with label video review. Show all posts

Monday, September 17, 2018

Chelsea cardigan by Designer Stitch

Chelsea cardigan in sweater knit 
The fall is here and I am in great need of appropriate clothes for cooler days. So, the new pattern from Designer Stitch came at the perfect time, the Chelsea Cardigan. I tested the pattern but I can assure you that the opinions are 100 percent honest. I made 3 of them so I wouldn`t waste my time and fabric on a pattern I don`t love. 
I made a full video review on YouTube with action videos too and the sewing tutorial on how to attach the collar is here


The Chelsea Cardigan is coming with three length options, pockets, and an optional belt. I made mine in the longer length but I definitely want to make it also in the shorter version. I made a size 3 with a swayback adjustment ( my typical adjustment)  and  I also made the pockets a bit deeper.


This version is made in a sweater knit from Driessenstoffen.nl , with a nice stretch and great drape, perfect for this pattern. To stabilize the shoulders I added clear elastic on the back shoulders and for the back neck I added seam tape to avoid stretching, it worked perfectly.


This one is made in ponti knit, and also here I used the stay tape to stabilize the back neck and the shoulders. Also, a good idea is to staystitch the pocket bags. I explain that also in the video (https://youtu.be/IeBlA9Nn3w4?t=16m8s). That makes the pockets to stay in place and not roll out.


The back is cut on the fold. I love the slightly A shape.
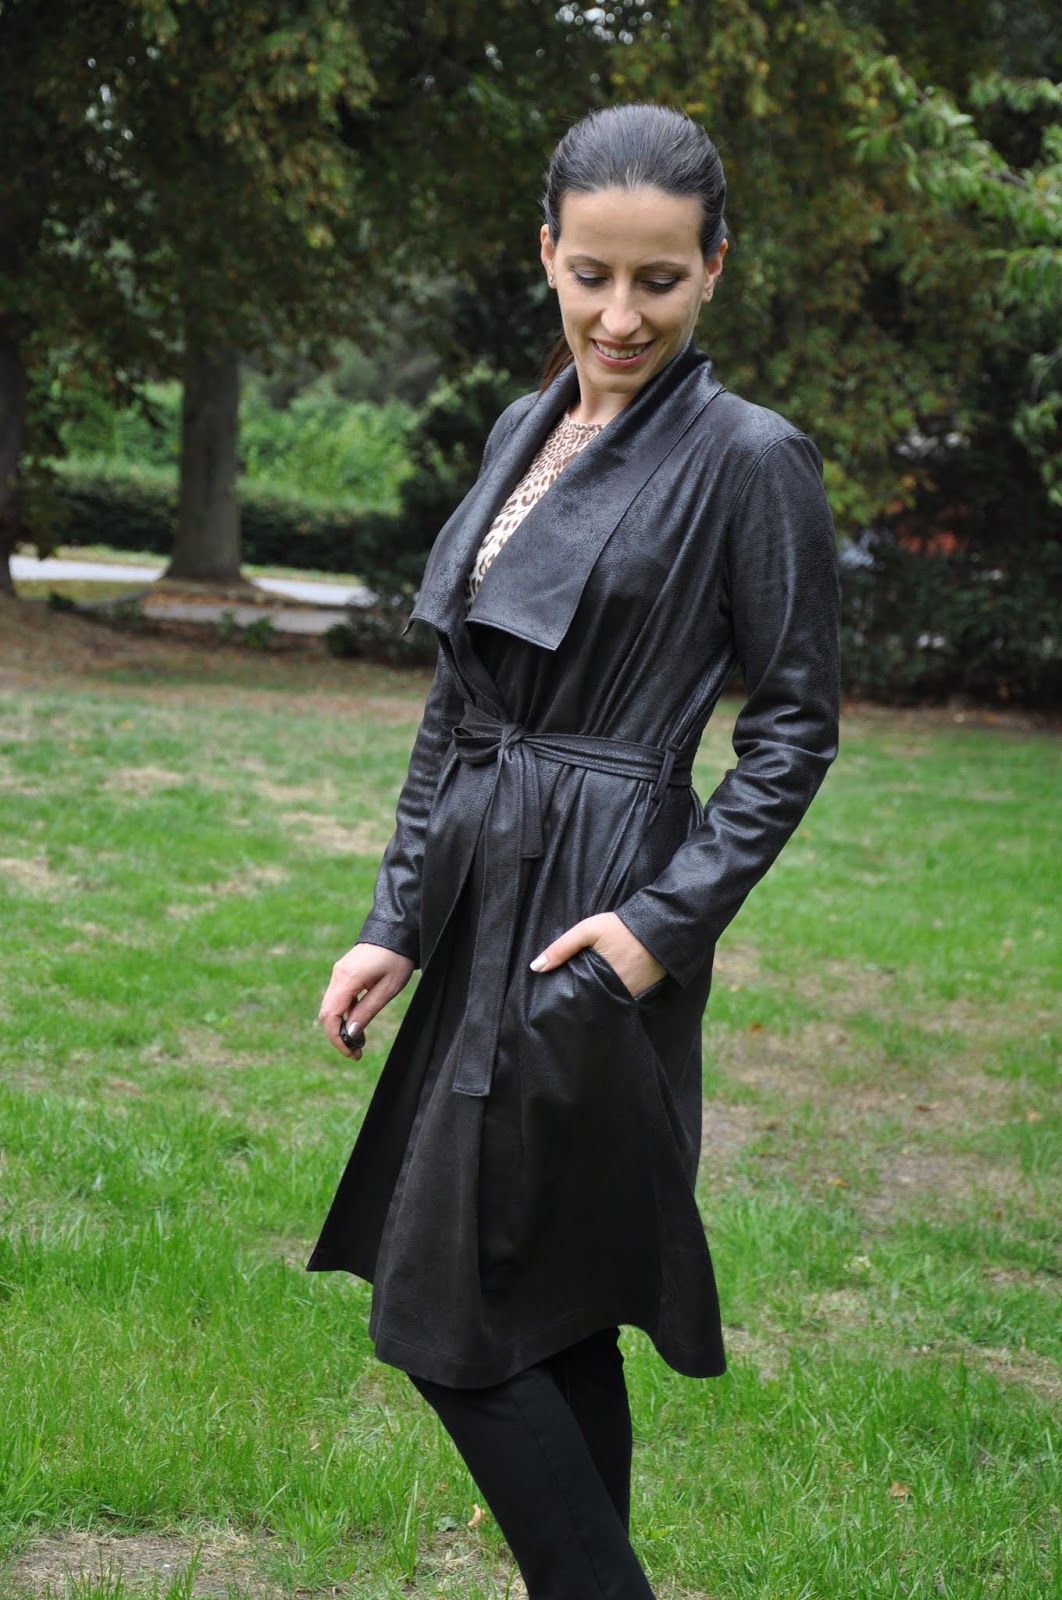
This version was made in a faux suede ( also from Driessenstoffen ) and to be honest I did not even think on how I am going to sew it ... Cutting was easy with my rotary cutter but when I tried to put a pin on it was almost impossible. 
So my tips on sewing with this fabric are: use wonder clips or paper clips to hold your pieces together, use a microtex needle, for me a 60/8 needle was the perfect one; don`t press directly on the fabric, use a pressing cloth, I use a piece of  silk organza which is also seethrough, use a slightly longer stitch length ( I used a 3), a walking foot can be very useful, I kept the IDT on my Pfaff engaged all the time. 

I wanted to topstitch my seams and decided also to leave the edges unfinished, this fabric is really like leather, it doesn`t reavel at all and if it is nice cut it really doesn`t need any finishing. The pattern has 6mm seam allowance, something to keep in mind. To finish the pockets edges, I used my pinking shears.

The instructions are to finish the collar by hand but because I did not want to fight with this fabric to get my needle in it ( I also did not have one so thin in the house, and going to the fabric store for a needle, or even order it online it would have great risks of  buying more fabric :))) So, I  thought on using the bagged method ( or also known as burrito method ) as you will use it on a shirt collar or a cuff . That worked PERFECT! I stitched till the shoulder seams and for the rest of the collar at the back I just fold the SA in, and topstitched Here above you can see how it looks from the inside. Very neat and super fast.

I love this version, it looks more like a coat but you know, much faster to make:). This fabric so soft!


Soon there will be a sew along at the Designer Stitch blog and I am going to make a video on the bagged method for the collar. So if you think that you don`t want the pattern because you need to hand stitch the collar, no worries the bagged method is super easy and super fast. I used it also on the black/purple ponti version and it worked perfectly.

...and here are the three garments in action :)


The Chelsea Cardigan is for a limited time in the sale 

Link to the Designer Stitch webshop https://bit.ly/2OyTIpm

Happy sewing!

**This post contains affiliate links
Disclaimer: In the name of full transparency, please be aware that this blog post contains affiliate links and any purchases made through such links will result in a small commission for me (at no extra cost for you). 


Saturday, August 18, 2018

Janice Dress pattern from KnipMode 6/2018 Still sewing for the summer


Dress Knipmode #23 6/2018

I think this is going to be the last summer dress. I can`t wait to start sewing for fall. The latest KnipMode is full of interesting patterns. But back to the dress above. 

My YouTube review you can see here ( including the pattern review, next projects, new fabrics and the action video)


This is one of their monthly "Jurken van Janice" ( Dresses from Janice). Every month dutch TV-personality and designer Janice presents a pattern in the KnipMode and every time there is also a video on YouTube where he shows more complicated parts of the pattern, how they are sewn up. I think that is a great idea and if he will use some more contrasting pattern/thread combination for the instructional video, it will be even better to understand some methods. 


This dress has a lot of nice details. It has cut-on sleeves, gathers under the bust, shaped waistband, the skirt is a little gathered at the CF and CB. Also, it has a side seam invisible zipper, and it is really needed as the waist is pretty fitted and also a CF blind button placket closure, and this last part is covered in the video of the month (Dutch language only)

The fabric is polyester ( from my "fabric guy" @shauniosdorp on IG ), not slippery and with a nice drape. It pressed very nice but cutting was not easy. The rotary cutter didn`t want to cut it and the normal sheers were having a big time trouble to cut it also, it was like going away from it. Finally, I remembered the serrated shears I have and I tried those, PERFECT. I could not believe what a difference!


Because is a pretty loose model I did not make a muslin for this pattern. I only traced size 38 at the bust and 36 for neck, shoulders, and waist. I measured the waist to be sure that it will fit me and did a bit of paper pattern fitting to get the idea of how it was fitting. I traced the skirt size 38 and that got gathered in the waist 36.  The pattern uses the same piece for the front and the back of the skirt, and to be honest I think my "back work " needs a bit more room, but it is ok . 

Normally I make a swayback adjustment on almost all the patterns I am sewing and when I don`t do that I can notice the difference, even if it is only 2cm. In the back/side pictures you can see how the side seams tend to go forwards, I tried to pinch up horizontally at my back of the skirt, 2 cm, and that corrected immediately my swinging side seams and the bit of extra fabric I was having , but that I can`t fix in this dress anymore so it is something to remember.


I love it with the belt and a small belt loop it gets sewn at the CB, nice detail.

The instructions are good, I only changed the order a bit so that I could finish the inside better. The waistband is faced, so after I attached the waistband and it's facing to the bodice, I attached the skirt to the waistband ( the one facing the public), pressed the seam up and then I folded the seam allowance of the facing and stitched in the ditch from the outside of the garment to the skirt. I used my stitch in the ditch presser foot which works perfect, so easy!


I love the placket on the front, it would have been nice to know the required size of the buttons , there was only mentioned that you need three buttons. I think is important to know that,  thinking that the placket is designed for particular size buttons. I know mine are too small but I like them and they fit the fabric ( and I found them very fast in my stash :))


...and the back with the little loop on the wide waistband!


This was a fun project, with all kind of nice details!
Next, I want to make a new Classic shirt but in combination with other pieces from the Recital shirt from Liesl and Co., a new denim jacket from the same KnipMode 6/2018 and sewing for my daughter is high on the list.

....and here you can see the "action" video 


Happy Sewing! 


Tuesday, July 31, 2018

Knipmode magazine dress 7/2015 plus invisible zipper video tutorial


The pattern for this dress from KnipMode magazine , no affiliate,( issue 7/2015) was one of those patterns that sometimes I see and just can`t forget! I remember I was looking in the magazine two years ago and this was the only pattern I liked from that issue and I didn`t buy the magazine for just one pattern. Later I regretted but I saw my chance when KnipMode started to offer their patterns also online, as PDF patterns.
The website is only in dutch but it is pretty easy to navigate. The only downside of their PDF is that they don`t have the layering function so I had to print all the sizes. It is still much easier than tracing the pattern from , these days, very busy patterns sheets.
The same, as in the magazine, the pattern has no seam allowance (SA) included and also the hem allowance needs to be added.  For the SA I use my SA rulers, very handy when working with patterns without seam allowance.


I know that the magazine picture doesn`t show anything of the pattern, I also don`t like that belt used with this dress but once you see the technical drawing you will see why I was excited about this dress.


The dress has side panels and the princess seam that is running over the bust goes all the way to the back. Also, I love the V neck on the back.


#Pattern adjustments:

KnipMode drafts their patterns for cup B and height 172cm. I am only 169cm and I always need to make length adjustments. I made a test garment first, I almost always do a test garment, that makes the final sewing much more enjoyable :) .
  •  I took 3 cm horizontally from the back and front panel( I measured 7cm from the CF down and there I took the 3cm out, and on the back at the same level as in the front, aprox.) , I had some extra fabric above the bust and on the back upper side and also the bust point of that side panel was too low, and all that extra room that was meant for the bust was too low on me. By taking the 3 cm out resolved all these problems.
  • After that, I had to lower the armhole by 1 cm as it was now too tight. 
  • I raised the V neck on the back by 1.5cm (5/8') to be sure that my bra band will not show.
  • Next change was to make a swayback adjustment, that is a typical adjustment for me, I took 2 cm out at the CB seam blending to nothing at the side seam.
  • The neckline was also a bit too high on me, so I lowered it by 1cm 
  • Als I did not add any hem allowance so I can say that the dress is 3cm shorter 


In the picture above, you can see that side panel better. I really love the fit now, on the test garment, the first time I put it on, I was a bit disappointed and was thinking that it is not so nice as I expected, but actually, the bad fit was the cause. ( also being made with an old bed sheet did not help :)).
The dress is made with a polyester crepe with some stretch in it, I had to steam a few edges a few times as it was getting very easy stretched out. Very important was to staystitch the armholes and necklines 
The neckline and the armholes are finished with a bias band and all the edges are overlocked.


I love the back! Love the back neckline! The dress has an invisible zipper in the back. On the YouTube video review , starting with minute 11.20 I am demonstrating how I am inserting an invisible zipper, I always use this method, very easy and fast.


If you are checking my back for print matching....there is none!:))) I tried but that back seam was to shaped to get it right and the fabric was not cooperating so I lost interest and just cut...I did cut single layer for the back. 

The pattern has also fisheye darts but I did not have any cloth to pinch for them , the dress is already fitted enough. 


I am super happy with this dress! I waited two years to make it, whatever....I love it!

On my YouTube chanel, you can find the video review too, including the zipper tutorial.

And here is the "action" video :


Thank you for reading and watching ! Happy sewing!