Search

Showing posts with label driessen. Show all posts

Monday, September 17, 2018

Chelsea cardigan by Designer Stitch

Chelsea cardigan in sweater knit 
The fall is here and I am in great need of appropriate clothes for cooler days. So, the new pattern from Designer Stitch came at the perfect time, the Chelsea Cardigan. I tested the pattern but I can assure you that the opinions are 100 percent honest. I made 3 of them so I wouldn`t waste my time and fabric on a pattern I don`t love. 
I made a full video review on YouTube with action videos too and the sewing tutorial on how to attach the collar is here


The Chelsea Cardigan is coming with three length options, pockets, and an optional belt. I made mine in the longer length but I definitely want to make it also in the shorter version. I made a size 3 with a swayback adjustment ( my typical adjustment)  and  I also made the pockets a bit deeper.


This version is made in a sweater knit from Driessenstoffen.nl , with a nice stretch and great drape, perfect for this pattern. To stabilize the shoulders I added clear elastic on the back shoulders and for the back neck I added seam tape to avoid stretching, it worked perfectly.


This one is made in ponti knit, and also here I used the stay tape to stabilize the back neck and the shoulders. Also, a good idea is to staystitch the pocket bags. I explain that also in the video (https://youtu.be/IeBlA9Nn3w4?t=16m8s). That makes the pockets to stay in place and not roll out.


The back is cut on the fold. I love the slightly A shape.
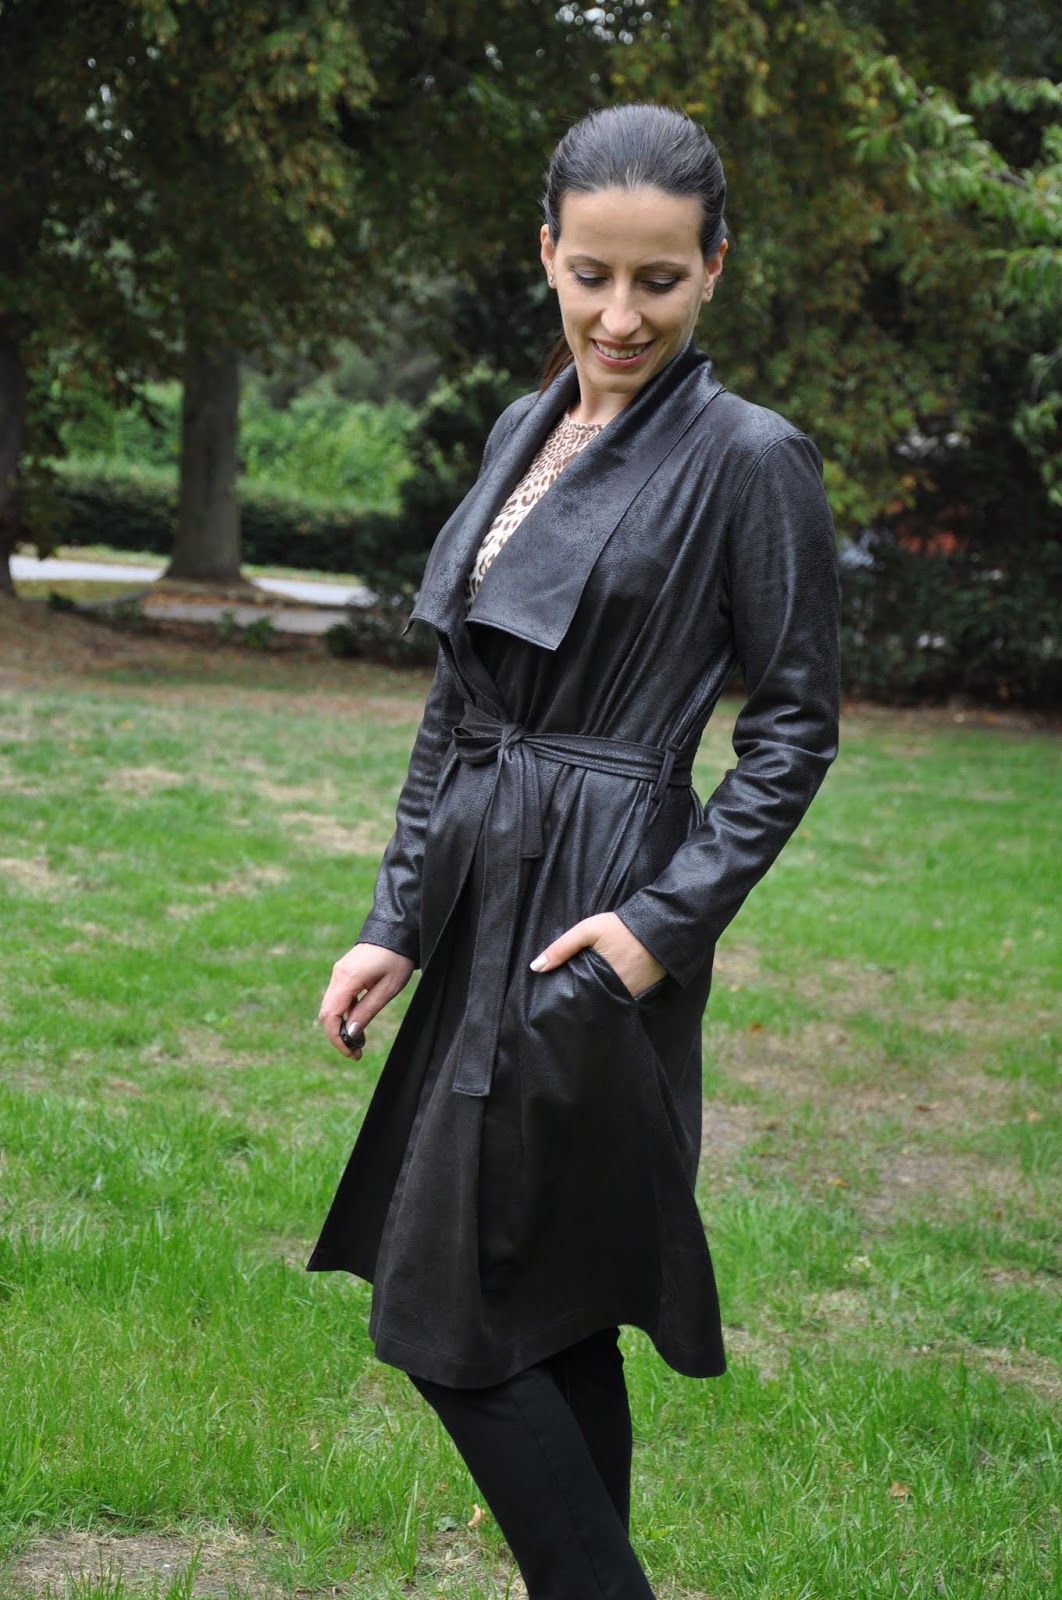
This version was made in a faux suede ( also from Driessenstoffen ) and to be honest I did not even think on how I am going to sew it ... Cutting was easy with my rotary cutter but when I tried to put a pin on it was almost impossible. 
So my tips on sewing with this fabric are: use wonder clips or paper clips to hold your pieces together, use a microtex needle, for me a 60/8 needle was the perfect one; don`t press directly on the fabric, use a pressing cloth, I use a piece of  silk organza which is also seethrough, use a slightly longer stitch length ( I used a 3), a walking foot can be very useful, I kept the IDT on my Pfaff engaged all the time. 

I wanted to topstitch my seams and decided also to leave the edges unfinished, this fabric is really like leather, it doesn`t reavel at all and if it is nice cut it really doesn`t need any finishing. The pattern has 6mm seam allowance, something to keep in mind. To finish the pockets edges, I used my pinking shears.

The instructions are to finish the collar by hand but because I did not want to fight with this fabric to get my needle in it ( I also did not have one so thin in the house, and going to the fabric store for a needle, or even order it online it would have great risks of  buying more fabric :))) So, I  thought on using the bagged method ( or also known as burrito method ) as you will use it on a shirt collar or a cuff . That worked PERFECT! I stitched till the shoulder seams and for the rest of the collar at the back I just fold the SA in, and topstitched Here above you can see how it looks from the inside. Very neat and super fast.

I love this version, it looks more like a coat but you know, much faster to make:). This fabric so soft!


Soon there will be a sew along at the Designer Stitch blog and I am going to make a video on the bagged method for the collar. So if you think that you don`t want the pattern because you need to hand stitch the collar, no worries the bagged method is super easy and super fast. I used it also on the black/purple ponti version and it worked perfectly.

...and here are the three garments in action :)


The Chelsea Cardigan is for a limited time in the sale 

Link to the Designer Stitch webshop https://bit.ly/2OyTIpm

Happy sewing!

**This post contains affiliate links
Disclaimer: In the name of full transparency, please be aware that this blog post contains affiliate links and any purchases made through such links will result in a small commission for me (at no extra cost for you). 


Tuesday, July 31, 2018

Knipmode magazine dress 7/2015 plus invisible zipper video tutorial


The pattern for this dress from KnipMode magazine , no affiliate,( issue 7/2015) was one of those patterns that sometimes I see and just can`t forget! I remember I was looking in the magazine two years ago and this was the only pattern I liked from that issue and I didn`t buy the magazine for just one pattern. Later I regretted but I saw my chance when KnipMode started to offer their patterns also online, as PDF patterns.
The website is only in dutch but it is pretty easy to navigate. The only downside of their PDF is that they don`t have the layering function so I had to print all the sizes. It is still much easier than tracing the pattern from , these days, very busy patterns sheets.
The same, as in the magazine, the pattern has no seam allowance (SA) included and also the hem allowance needs to be added.  For the SA I use my SA rulers, very handy when working with patterns without seam allowance.


I know that the magazine picture doesn`t show anything of the pattern, I also don`t like that belt used with this dress but once you see the technical drawing you will see why I was excited about this dress.


The dress has side panels and the princess seam that is running over the bust goes all the way to the back. Also, I love the V neck on the back.


#Pattern adjustments:

KnipMode drafts their patterns for cup B and height 172cm. I am only 169cm and I always need to make length adjustments. I made a test garment first, I almost always do a test garment, that makes the final sewing much more enjoyable :) .
  •  I took 3 cm horizontally from the back and front panel( I measured 7cm from the CF down and there I took the 3cm out, and on the back at the same level as in the front, aprox.) , I had some extra fabric above the bust and on the back upper side and also the bust point of that side panel was too low, and all that extra room that was meant for the bust was too low on me. By taking the 3 cm out resolved all these problems.
  • After that, I had to lower the armhole by 1 cm as it was now too tight. 
  • I raised the V neck on the back by 1.5cm (5/8') to be sure that my bra band will not show.
  • Next change was to make a swayback adjustment, that is a typical adjustment for me, I took 2 cm out at the CB seam blending to nothing at the side seam.
  • The neckline was also a bit too high on me, so I lowered it by 1cm 
  • Als I did not add any hem allowance so I can say that the dress is 3cm shorter 


In the picture above, you can see that side panel better. I really love the fit now, on the test garment, the first time I put it on, I was a bit disappointed and was thinking that it is not so nice as I expected, but actually, the bad fit was the cause. ( also being made with an old bed sheet did not help :)).
The dress is made with a polyester crepe with some stretch in it, I had to steam a few edges a few times as it was getting very easy stretched out. Very important was to staystitch the armholes and necklines 
The neckline and the armholes are finished with a bias band and all the edges are overlocked.


I love the back! Love the back neckline! The dress has an invisible zipper in the back. On the YouTube video review , starting with minute 11.20 I am demonstrating how I am inserting an invisible zipper, I always use this method, very easy and fast.


If you are checking my back for print matching....there is none!:))) I tried but that back seam was to shaped to get it right and the fabric was not cooperating so I lost interest and just cut...I did cut single layer for the back. 

The pattern has also fisheye darts but I did not have any cloth to pinch for them , the dress is already fitted enough. 


I am super happy with this dress! I waited two years to make it, whatever....I love it!

On my YouTube chanel, you can find the video review too, including the zipper tutorial.

And here is the "action" video :


Thank you for reading and watching ! Happy sewing!


Sunday, May 6, 2018

Eden cold shoulder Jumpsuit-Designer Stitch Pattern


I love wearing jumpsuits, in one step ready to go! I made a few and I still wear them a lot.
So a new jumpsuit pattern from Designer Stitch means a new jumpsuit for me. This is the Eden Jumpsuit! 
The pattern has options for short ( playsuit) leg or long leg, sleeveless or cold shoulder sleeve or you can even make only the pants. As usual, the pattern has cup sizing.  


I made the longer leg version with the cold shoulder. I started with size 3C and made a muslin. Based on the fit of my muslin I changed the pattern to size 2 for the shoulders/neck area and kept size 3 for the bust /waist/hips. Also did my usual swayback adjustment of 1.5cm. The jumpsuit closes with an invisible zipper at the back and it also has elastic in the waist. I sewed the zipper only on the bodice area. The waist with the elastic is wide enough to pull the pants up without having an opening at the back of the pants .


The fabric is rayon with small paisley motifs. I think this fabric is perfect for this pattern, great drape, I love it.
To give a better impression on how great this fabric is for this pattern, I made a small video. I think that is great to see how the garment "moves"


I am very happy with this jumpsuit and I have at least two fabrics that I want to transform in Eden jumpsuits. 
The pattern is just released and now for a limited time on sale at the Designer Stitch Patterns shop.


*This post contains affiliate links


Monday, March 26, 2018

Knippie dress


This is the kind of dress I would like to make for myself and wear all day!Super comfortable with pockets and suitable for cozy warm knit fabrics. But this time the dress is for Lisa :) ! 

**********
Dit is het soort jurk ik wil voor mezelf maken en de hele dag dragen! Super comfortabel, met zakken en geschikt voor gezellige warme gebreide stoffen. Maar deze keer de jurk is voor Lisa:)


The pattern is from Knippie Magazine 5/2016, Dress 119. I made size 134 with the length of 146. The original is very short and I wanted to make it a little longer for warmth. Lisa fits in their 128 size in the size chart but after I measured the pattern pieces I realized that 134 fits her perfect.
 The pattern comes with facings to finish the neck but I used a strip of the fabric folded in half ( just a bit smaller than the circumference of the neck hole on the dress ) and I sew that using my serger.

**********

Het patroon is van Knippie Magazine 5/2016, Jurk 119. Ik heb maat 134 gemaakt met de lengte van 146. Het origineel is erg kort en ik wilde het iets langer maken voor warmte. Lisa past in hun maat 128 in de maattabel, maar nadat ik de patroondelen had gemeten, realiseerde ik me dat 134 perfect bij haar past.

Het patroon is voorzien van beleg om de nek af te werken, maar ik heb een strook stof dubbelgevouwen, net iets kleiner dan de omtrek van het halsgat, en dat heb ik met my locker genaaid. 


Very easy to make, I think this can be done in a half hour! For me took a lot much longer because I had the brilliant idea to use my coverstitch to add a bit of interest at the seams. That is a great detail but in my case, my machine did skip a few stitches and I had to undo some seams and boy, that took a lot of time! At a moment I was so done with the whole unpicking that I could not bear to take anything out again! So, I had the same print fabric in another color and I made a small applique to cover the mistake. I hate that machine!!!

**********

Zeer gemakkelijk te maken, ik denk dat dit in een half uur kan worden gedaan! Voor mij duurde het veel langer omdat ik het briljante idee had om mijn deksteek machine ( coversteek) te gebruiken om een beetje interesse toe te voegen. Dat is een geweldig detail, maar in mijn geval heeft mijn machine een paar steken overgeslagen en moest ik enkele naden ongedaan maken en jongen, dat kostte veel tijd! Op een gegeven moment was ik zo klaar met het hele ontrafelen dat ik het niet kon verdragen om er weer iets uit te halen! Dus ik had dezelfde printstof in een andere kleur en ik maakte een kleine applicatie om de fout te dekken. Ik haat die machine !!!


I love the fabric! It is french terry from Driessenstofen  , beautiful quality after a few times washing it is still beautiful. Very soft and comfortable, of course, perfect for children's clothes.

**********

Ik ben dol op de stof! Het is french terry van Driessenstofen, mooie kwaliteit na een paar keer wassen is het nog steeds mooi. Zeer zacht en comfortabel, natuurlijk perfect voor kinderkleding.


Lisa is really happy with her dress and me too with the pattern. 

**********

Lisa is erg blij met haar jurk en ik ook met het patroon.

Monday, December 11, 2017

Faux leather Santi Skirt -Designer Stitch Patterns

I don`t get so much sewing time these days so while I have a lot of patterns on my sewing wishlist, I  don`t have the time for tracing patterns, making muslins and so on. Testing patterns for Ann Grose from Designer Stitch is making it easy, as I know how her patterns are fitting me.
This is the latest pattern from Designer Stitch Patterns, the Santi skirt


The Santi Skirt has 8 gore panels for shaping, front patch pockets, and a self-shaped belt.


I made a size 3 and as you can see the original pattern is much shorter than my skirt. First I was planning to make my Santi in corduroy ( blue, rust or dark red) but while trying to decide on the color, I saw this fabric at Driessen Stoffen ( no affiliate) and thought that it will be perfect for my skirt. It is a kind of faux leather and the back side of the fabric is a kind of  knit...or something very soft and nice so I`ve got immediately this idea of a midi skirt and the result is exactly what I had in my head. The fabric drapes also very nice.


To get this look I lengthened the pattern by 19cm. The Designer Stitch patterns have lines for length adjustments so that was easy.
This is the back of the fabric, very soft and also easy to sew.

Of course, on this pattern, you can go crazy with topstitching! I love topstitching and I made a few swatches before I decided on the topstitching thread. I am happy with my choice, not too bold but also not getting lost in the color of the fabric. 


The pattern is pretty easy but all the topstitching can take some time.
The skirt has a centered back zipper opening. The belt should have been cut on the fold, but I have a center back seam because I did not have enough fabric. I ordered only 1.5m which it would have been enough for the original design but not for my extra lentgh.


I think this fabric is perfect for this pattern and now I only need to find some time to make my corduroy version or versions :) too.


The Santi skirt is now on sale for a limited time on the Designer Stitch shop. 
The turtleneck is the Hepburn from Itch to Stitch Patterns which I made a few times, also here 

*This post contains affiliate links 

Sunday, September 24, 2017

Beryl Bomber Dress-Named


Ahh, Named Patterns, they have so many patterns I want to sew and
 most of them I have them too but from past collections, I only managed to sew the  Tyyni Cigarette trousers, which I wear very often and the Talvikki Sweater, also a favorite. I hope I can sew this fall the Pilvi Coat dress   and some more but until then I managed to sew one of the patterns out the latest collection, Fall/Winter '17 Earth Science and that is The Beryl Bomber Dress  .


This pattern is inspired by the bomber jacket, with a V-neck and wide rib knit collar. The dress is unlined at it has a front zipper closure. The advice is to use a firm rib knit for the collar, but I could not find any in the right color and so I went with this fine rib knit but next time I will try to find something much more stable as this one is a bit too soft and is not staying up  at the back .
I used a stretch cotton which I bought a while ago only because I loved the colors and even if I love the result I think that this dress will be perfect in a softer fabric with a bit more drape.


I agonized about choosing which size to make. I am between 3 sizes on Named size chart so I kind of blended between the three. This is made in size 36 for the shoulders, 40 for the bust, 38 to the waist and 36 hips, I know, I think I was still agonizing when I decided on what to cut :) . I make almost always a muslin but I thought this was a loose fitting dress so I took my chance. I  got lucky this time as I am very happy with the fit. I can`t wait to make another version of this!


Yeah, I think the sleeves are a bit too long...the pattern is saying 3/4 sleeves but on me is a bit odd length, not long and not 3/4, so that will get adjusted in the next version. The front has bust darts and I am happy that those are coming in the right spot. Love the big pockets on this dress !


For the waist elastic casing is used a 4.5cm ribbon but I did not have that so I used a piece of cotton instead and that worked great. The instructions are great and this dress was pretty easy to sew. 


This little guy wanted to help but actually, he made the whole "taking pictures process"  taking three times longer :)) 
So, this is my Beryl dress and I am very happy with it. I would love to try the Agate Pencil dress but I think first I want to make a new shirt, Lisette has a new pattern, The recital Shirt , and because I already made that other shirt pattern they have ( and the pieces of the new one can be combined with the Classic shirt) , the fitting part is easy. 


Tuesday, September 5, 2017

Kristen Dress -Designer Stitch Two times


Finally something new in almost one month! And this is not just  "something", there are actually two dresses that I love. This is the latest pattern from Designer Stitch, Kristen dress, and the testing started exactly when I was going away for the summer holidays so I can`t say that I tested this, so this is more like a review.
The Kristen dress has a princess style bodice with pleated flared skirt. It comes with cups sizes ( B, C, D and DD)  and in sizes 2-22. It can be sleeveless or with flared sleeves. There are also optional side seams pockets.

 I wanted to make this dress really bad as I love the ruffles and the skirt volume. You can see that I loved the ruffles so much and so I made the first dress without them :)). 
I could not decide on the fabric to use, and because I was not pressed by the timeline for the testing I did have a lot of time to think about my fabric choice. I had a few other fabrics in my stash for this but the skirt was not fitting and so I had to search again ( in my stash :) ) and found this...perfect width, great print/color but the weight was not good to make it with the ruffles. This is a stretch poly crepe, medium weight and there was no way I could get ruffles out of it...or at least nice ones. I think it looks great without too.

I made a size 2C ( US4) for the shoulders and bust blending to size 3 at the waist. It was possible to make a size 2 also for the waist as I have a bit of ease there, but like this, it is very comfortable around my waist ( I can eat at ease without being afraid that I will pop out of my dress ). I made my usual changes ( 1cm narrow shoulders adjustment, 1 cm sway back adjustment and at the center back neck I took 1 cm ( with a total of 2cm) out blending to nothing as I had a bit of gaping in my muslin stage) Also I took 5cm off the length of the skirt ... I am thinking now that I could put that back in a future dress to get another look. Really happy with the fit, like very very happy! 


   I had to decide on the print matching...while I was only in the mood to sew, so after getting up on the front, pretty fast,  I took some time to get the back matched, at the zipper. It looks ok...maybe like 1mm off but who is looking ?? :)) I interfaced the zipper area for strength and to get a bit more grip on my stretchy fabric.


I love this dress, the fit is great, and I think I love it so much also because I did not have to work so much to make it fit,  Ann from Designer Stitch knows her thing :).
And because I love so much this version and because this pattern is about the ruffles, I made immediately one more, with ruffles! Both fabrics are from Driessenstoffen  ( no affiliate).


I love when I can sew, without worrying about the fit. You get that when you make repeats of the same pattern, so this was easy and fast. The ruffles did make my life difficult ( and my fingers to hurt). Actually, the fabric is to be blamed! This is a polyester crepe, lovely print, and drape but sewing was a bit of a pain. I had to use a 75 stretch needle as the 80 and 90 were too thick and this 75 stretch was the only one that wanted to sew well. Also gathering this fabric was a pain ....I used big stitches for my gathering stitches but not too big as the front and the neck ruffles are gathered with one row, but oh boy the fabric did not want to move on my thread! For the armholes ruffles I tried to gather with my serger as I sometimes do on 6mm SA, but that was also a pain...anyway , after a bit of swearing and sweating, it was done ! 


This is not me twirling :), is just the wind, the skirt has nice flare and the fabric is light...which makes it dangerous  wearing it on the street on a windy day :)))
There were no changes, I used the same pattern as in the black/flowers print.


Really love the ruffles! New haircut, as you can see in these pictures, I have no idea what to do with it, I wore my hair for years in a pony tail so I need to find my way with it, I hope :))

And now off to do some more sewing :) 
PS: The Kristen dress is now for a limited time on sale  


*This post contains affiliate links