Search

Showing posts with label designerstitch. Show all posts

Monday, December 11, 2017

Faux leather Santi Skirt -Designer Stitch Patterns

I don`t get so much sewing time these days so while I have a lot of patterns on my sewing wishlist, I  don`t have the time for tracing patterns, making muslins and so on. Testing patterns for Ann Grose from Designer Stitch is making it easy, as I know how her patterns are fitting me.
This is the latest pattern from Designer Stitch Patterns, the Santi skirt! 


The Santi Skirt has 8 gore panels for shaping, front patch pockets, and a self-shaped belt.


I made a size 3 and as you can see the original pattern is much shorter than my skirt. First I was planning to make my Santi in corduroy ( blue, rust or dark red) but while trying to decide on the color, I saw this fabric at Driessen Stoffen ( no affiliate) and thought that it will be perfect for my skirt. It is a kind of faux leather and the back side of the fabric is a kind of  knit...or something very soft and nice so I`ve got immediately this idea of a midi skirt and the result is exactly what I had in my head. The fabric drapes also very nice.


To get this look I lengthened the pattern by 19cm. The Designer Stitch patterns have lines for length adjustments so that was easy.
This is the back of the fabric, very soft and also easy to sew.

Of course, on this pattern, you can go crazy with topstitching! I love topstitching and I made a few swatches before I decided on the topstitching thread. I am happy with my choice, not too bold but also not getting lost in the color of the fabric. 


The pattern is pretty easy but all the topstitching can take some time.
The skirt has a centered back zipper opening. The belt should have been cut on the fold, but I have a center back seam because I did not have enough fabric. I ordered only 1.5m which it would have been enough for the original design but not for my extra lentgh.


I think this fabric is perfect for this pattern and now I only need to find some time to make my corduroy version or versions :) too.


The Santi skirt is now on sale for a limited time on the Designer Stitch shop. 
The turtleneck is the Hepburn from Itch to Stitch Patterns which I made a few times, also here 

*This post contains affiliate links 

Monday, November 13, 2017

Tanner Culotte -Designer Stitch Pattern


Culotte, a style totally new to me. The new Designer Stitch PDF pattern, the Tanner culotte ( aff) is not something I would choose to make but being a tester for Designer Stitch you get the push to try new things. I gave it a try and I am so happy I did. The pattern is pretty easy to make and if you love topstitching this pattern is perfect for it.

I just love the big pockets and the look with the self-fabric belt, wide belt loops, the back yoke and the width of the hem. This pattern (aff) is made for no stretch fabrics and this denim has no stretch but it is still very comfortable.

I struggled with the length of my Tanner culottes but I think this works perfectly for me, love the look with the long boots. 


I am very pleased with this pattern (aff) and can`t wait to make it in some other fabrics.


Wednesday, October 4, 2017

Frida Dress, Designer Stitch pattern


The new pattern from Designer Stitch, the Frida Khalo dress (aff). In this pattern, the main focus is on the fabric. The pattern with its simple lines is perfect to be used with beautiful special fabrics. The inspirational images were really beautiful and when I started looking for some embroidered fabric, the search was not easy. After the test was done, these fabrics were everywhere, so lucky you, if you want to make a Frida. 


The Frida pattern (aff) has a few options for length ( top, tunic, dress ), with or without a flounce and also a few sleeve options ( short, long, short gathered puff or gathered long sleeve bishop).  I made a muslin in size 2 and I only made a 1 cm narrow shoulder adjustment. 


My first version was made in this gorgeous embroidered velvet ( no aff.), which I ordered  when I knew that I was going to test this pattern, but at that moment, I did not know ( I missed that) that in the front  are 6 pintucks and when I got my fabric I knew that there was no way to make nice pintucks in that fabric so I changed that in gathers.
Also to fit nice in my embroidered motifs I decided to add 10 cm to the full dress option....at the moment I had something in my head, like a nice cozy autumn dress but after making the first pictures it felt not really "me " so I got an idea to add some elastic at the waist, to make it more fitted. I used a method similar to this


 only I attached the elastic directly on the dress, instead of making the casing first.


Also, the sleeves are different than the pattern...I did that to fit nice in the embroidery, it is the normal sleeve pattern with a length of 31 cm, from the shoulder down. I added elastic at the sleeve hem too.


 Another change was to finish the neckline with bias band turned to the inside to get an invisible result on the outside. 


Love this dress!


This version is made in a border embroidered cotton. I loved this fabric when I saw it online, only when it got to me, it was not blue with white embroidery, as advertised but a bit purple with light purple embroidery. 


I played a bit with the embroidery, to get a nice pattern on the front and back yoke and that is why I added a center front seam. In this version, I made the pintucks and I love the look in this thin cotton. 


I am very happy with both versions and I know what I am going to sew with the next embroidered piece of fabric I will find. 
The new Frida Dress is to be found at the Designer Stitch shop, in PDF format with English instructions.

Tuesday, September 5, 2017

Kristen Dress -Designer Stitch Two times


Finally something new in almost one month! And this is not just  "something", there are actually two dresses that I love. This is the latest pattern from Designer Stitch, Kristen dress, and the testing started exactly when I was going away for the summer holidays so I can`t say that I tested this, so this is more like a review.
The Kristen dress has a princess style bodice with pleated flared skirt. It comes with cups sizes ( B, C, D and DD)  and in sizes 2-22. It can be sleeveless or with flared sleeves. There are also optional side seams pockets.

 I wanted to make this dress really bad as I love the ruffles and the skirt volume. You can see that I loved the ruffles so much and so I made the first dress without them :)). 
I could not decide on the fabric to use, and because I was not pressed by the timeline for the testing I did have a lot of time to think about my fabric choice. I had a few other fabrics in my stash for this but the skirt was not fitting and so I had to search again ( in my stash :) ) and found this...perfect width, great print/color but the weight was not good to make it with the ruffles. This is a stretch poly crepe, medium weight and there was no way I could get ruffles out of it...or at least nice ones. I think it looks great without too.

I made a size 2C ( US4) for the shoulders and bust blending to size 3 at the waist. It was possible to make a size 2 also for the waist as I have a bit of ease there, but like this, it is very comfortable around my waist ( I can eat at ease without being afraid that I will pop out of my dress ). I made my usual changes ( 1cm narrow shoulders adjustment, 1 cm sway back adjustment and at the center back neck I took 1 cm ( with a total of 2cm) out blending to nothing as I had a bit of gaping in my muslin stage) Also I took 5cm off the length of the skirt ... I am thinking now that I could put that back in a future dress to get another look. Really happy with the fit, like very very happy! 


   I had to decide on the print matching...while I was only in the mood to sew, so after getting up on the front, pretty fast,  I took some time to get the back matched, at the zipper. It looks ok...maybe like 1mm off but who is looking ?? :)) I interfaced the zipper area for strength and to get a bit more grip on my stretchy fabric.


I love this dress, the fit is great, and I think I love it so much also because I did not have to work so much to make it fit,  Ann from Designer Stitch knows her thing :).
And because I love so much this version and because this pattern is about the ruffles, I made immediately one more, with ruffles! Both fabrics are from Driessenstoffen  ( no affiliate).


I love when I can sew, without worrying about the fit. You get that when you make repeats of the same pattern, so this was easy and fast. The ruffles did make my life difficult ( and my fingers to hurt). Actually, the fabric is to be blamed! This is a polyester crepe, lovely print, and drape but sewing was a bit of a pain. I had to use a 75 stretch needle as the 80 and 90 were too thick and this 75 stretch was the only one that wanted to sew well. Also gathering this fabric was a pain ....I used big stitches for my gathering stitches but not too big as the front and the neck ruffles are gathered with one row, but oh boy the fabric did not want to move on my thread! For the armholes ruffles I tried to gather with my serger as I sometimes do on 6mm SA, but that was also a pain...anyway , after a bit of swearing and sweating, it was done ! 


This is not me twirling :), is just the wind, the skirt has nice flare and the fabric is light...which makes it dangerous  wearing it on the street on a windy day :)))
There were no changes, I used the same pattern as in the black/flowers print.


Really love the ruffles! New haircut, as you can see in these pictures, I have no idea what to do with it, I wore my hair for years in a pony tail so I need to find my way with it, I hope :))

And now off to do some more sewing :) 
PS: The Kristen dress is now for a limited time on sale  


*This post contains affiliate links


Wednesday, June 14, 2017

Bridget blouse and Alyse pants -Designer Stitch Patterns


This month Designer Stitch is celebrating its 1-year anniversary. I wanted to sew a DS pattern for this occasion and I ended up sewing 2. So happy anniversary Designer Stitch ( and congrats to Ann Grose the mastermind behind the patterns).


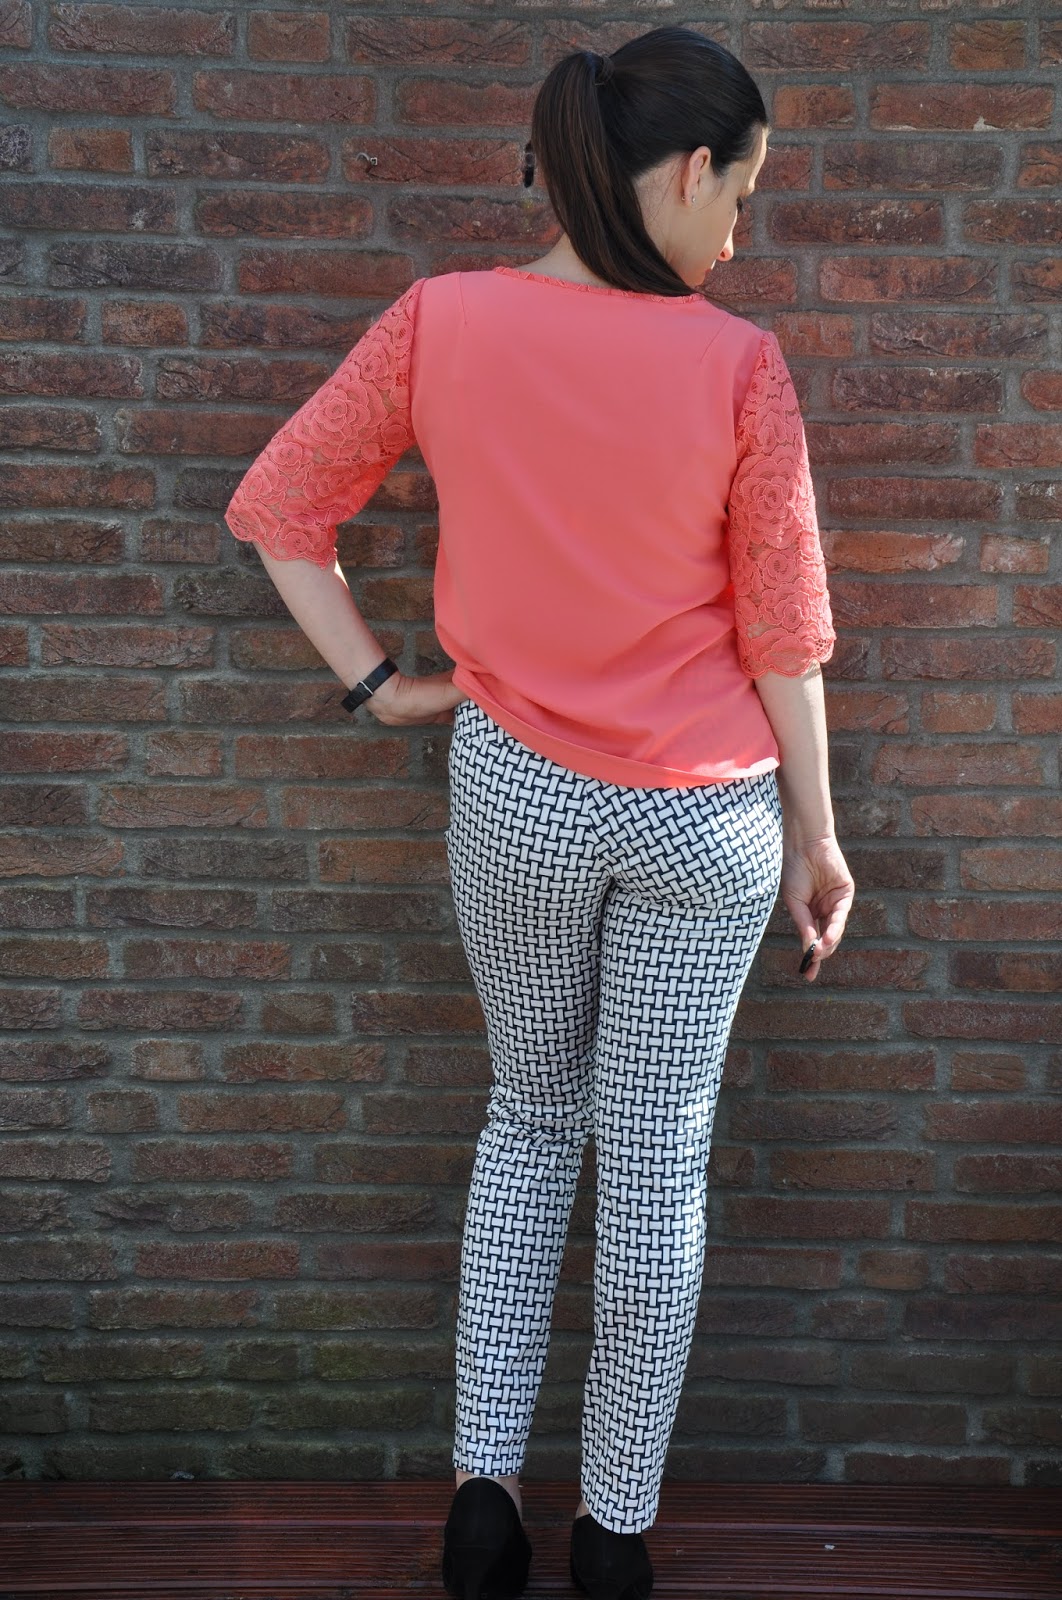
 The pants are the Alyse slim leg pants , made for woven stretch fabrics with 4% spandex...The pants are based on a stretch ratio of 20% 
I made my first muslin in size 3, in a stretch cotton sateen and it was a bit too big overall so smart me, I took size 2 as I was think that it will be much better overall, and made a new muslin...in a fabric with almost no stretch....I know... Stupid me. Ofcourse it didn't fit so I cut in the same fabric as the first one and the fit was almost perfect. 


This is sewn with 1cm SA instead of 1.5cm, also I took a bit of fabric from the back leg out and I think the fit is really nice. I omitted the pockets. I made my final pants also in a stretch cotton sateen. Love the snug fit and the slim legs...that are not too tight.


The blouse is the Bridget pattern , and I used the sleeves from the "short sleeve " pack, the mid-elbow sleeve. 
I made this pattern also here in a red crepe, and here in a polyester fabric, so I had no fitting work .I used the same pattern as for the red Bridget, size 2C for the bust and blending at 4 for the waist and 6 for the hips. No waist darts and no zipper. This pattern has cup sizing so that makes it easy to fit.

This coral crepe was so nice to sew. So spongy and soft. Also to wear is a pleasure, it even has a bit of stretch .

The lace sleeves were pretty easy to sew. For the sleeve seam, I used first a straight stitch and then at a 0.5 cm or something like that away from the straight stitching line, I did a small zigzag and trimmed the rest of my SA next to the zigzag. I saw this finishing method in the "Sewing lingerie" class from Alison Smith, on Craftsy . My corded lace wouldn't feed nicely under the locker. 


I finished the neckline with a stroke of lace , sewn first by machine turned and hand sewn in place. The stroke is also finished with a small zigzag.

I also finished the armholes with a bias band, self-made and finished by hand. The side and shoulder seams are sewn with french seams. I love the neat look inside.   For the sleeves hem, I used the edge of my fabric.

And the inside :)


And this is it. Two nice pieces in my wardrobe, and two pieces of fabric out of my stash.
On the Designer Stitch Patterns Support  Facebook group are this week all kind of special offers and giveaways, I think it worth taking a look.
Happy Anniversary, Designer Stitch and Ann keep up the good work.

Thank you for reading! 


*This post contains affiliate links