A new video review is on my YouTube channel, I am talking about the Taylor dress pattern and about the two versions I made. This is a great pattern, made for knit fabrics and offering cup sizing for an easy fit.
At the end of the video, there is also a modeling video where you can see how nice those flounces are moving:)
Meg from @cookinandcraftin started last month the #sewtwistsandties project, so I also got inspired by all the projects there and I stopped at this pattern from Knipmode Magazine, extra 10/2015.
A knit dress with a fitted skirt and a cool twist detail on the front bodice.
I made a video review about it on my YouTube channel here
The fabric is a beautiful stretch velvet from Megastoffen.nl.
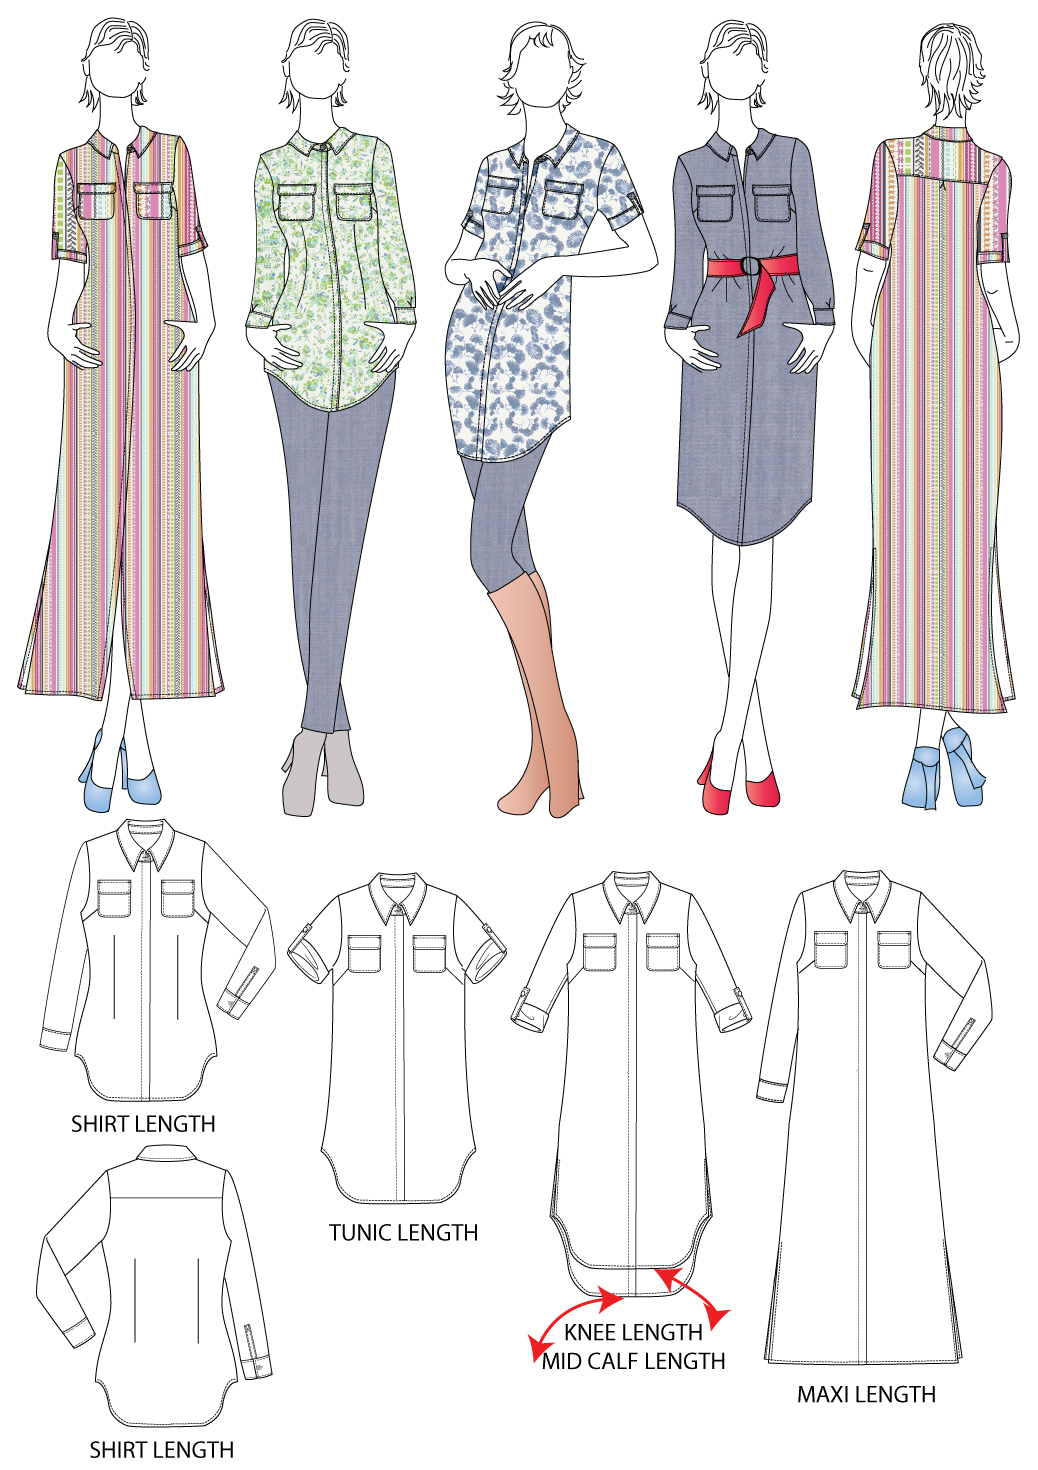
As usual with the Designer Stitch patterns,the Sedona patternis full of options. It has all the classic shirt details, like a back yoke, collar with a stand, sleeves with the classic placket and cuff, 3/4 sleeve and short sleeve. Also, there are 5 options for the length and with the exception of the maxi length, the other lengths have a shaped hem. For a more fitted look there are fisheye darts on the pattern and in the back you have the option for a pleat, not to be used in combination with the waist darts. Also, there are optional front patch pockets and inseam pockets for the dress options. And one of the main features of this design is the concealed button placket.
But, one of the most important features is that the Sedona comes with cups sizing, that makes it so easy to fit! The sizes are (US) 2-22 (EU) 34-54 (UK )6-26
I made my dress in size 3 cup C and I made my standard adjustments: narrow shoulders adjustment, lifted the dart point by 1cm and I wanted the armhole a bit higher at the underarm so I adjusted the sleeve head accordingly to make it fit in my new armhole.
As you can see in these pictures I made 3 versions of this pattern, actually 4, a maxi version in challis from Minerva Crafts, but that one it will be blogged on the Minerva blog, and that is definitely a favorite! I will post a link when it will get live.
The first version of the Sedona was this knee-length dree made in beautiful cotton, black with white polka dots weaved in the fabric.
The weight of the fabric and drape were perfect for this dress! I omitted the back pleat and the waist darts. I love the fit over the bust and shoulders, I think is perfect!
The next versions I made, and I sewn these two at the same time, was a tunic length in the blue/white poly/cotton blend and a shirt version in a stretch crepe.
Because the crepe has a softer drape I did add the back pleat here! Also in these two versions, I omitted the waist darts, I like the loose fit, not too boxy.
To finish the bottom edge, instead of turning the hem and stitch I use bias tape and bound the hem, I think is a nice detail.
I love the sleeves with the placket and cuff, as you can see I used these in all my versions! I can sew one in no time now, after all these :)).
For the dress, I also made a belt from the fashion fabric. I am very satisfied with this pattern and I think with a few small changes I can get a lot of different looks.
Here are a few inspiration pictures from my Pinterest board, that I really want to try!
Disclaimer: Please be aware that this blog post contains affiliate links and any purchases made through such links will result in a small commission for me (at no extra cost for you).
I love to see patterns with special style lines, so those are always getting high on my "to sew"wishlist. That was also the case with this KnipMode Magazine dress from December issue 2018.
Lovely princess seams, front and back yokes and there is even an option for a small flounce for the sleeves and a cuff.
I think this is a really cool pattern. They have it in the magazine in a few variations, like a top, as a dress with a bit fitted skirt, the one I used, or with a bit more flared skirt. The difference is in the side panel of the skirt, there are two extensions to make the side panel wider at the hem. Here you can see the tech drawing.
A perfect pattern for color blocking, also in the magazine versions they used a sort of trim that it gets sewn in the seam. I think their dresses are much more fun than my grey one :)) but I know this is something I will get a lot of wear from.
I made a muslin for size 36 /38. It was way too fitted so I decided to make size 38 an keep 36 only for the shoulder length. For next time I need to remember that I should measure myself before I start on a new pattern. I did not do that for a while and it looks like I gained some cms around my waist and hips. Based on the test garment I also shortened the back length ( or swayback adjustment) and also took a bit off ( a total of 2cm) at the CB neck. I did not use a zipper as the fabric is stretchy enough. If I would use a zipper in a fabric like this I would definitely interface the zipper area (actually I will do it in any fabric).
For my test garment, I did not follow the instructions so I made a bit off a mess of the side point, where all the panels are coming together but it is actually so easy, following the instructions made it very easy, so well done KnipMode on that. This is the idea of it...as highlighted in this picture
I also topstitched all my seams. I sewed the whole thing on the serger, topstitched with the sewing machine and made the hems on my cover stitch, which behaved very well on this fabric:). The fabric is a very thick knit fabric it does stretch a lot but I think a bit more stretch it would have been even better. For the next time, I need to give just a bit more extra room at the bust as you can see it is a bit tight and gaping there at the armhole, although is still feeling comfortable. ( I think here are again the few extra cms I gained and did not account for :)))
Adding clear elastic in the back shoulders.
To give a little support on my shoulders seam I added some clear elastic. I have the 6mm which is fitting perfectly in that hole of the standard presser foot from the serger. Without stretching I just let it feed as the serger is sewing the fabric. An alternative could be seam tape or woven selvage.
Dress back
I kept the center back seam as I think it brakes a bit the back panel and it does have shaping in it.
Also, I used another method then instructed to finish the neckline. The instructions are telling you tu turn the SA to the inside and topstitch but I don`t really like that method so I cut a strip of my fabric a bit shorter than the neckline to ease that a bit into my strip and be sure it will lay flat. Sewed right sides together, trimmed the SA and turned to the inside and topstitched, I think it looks great!
The pattern is also as a PDF in their webshop and you actually get both dress options( and the top of course). Here is a link ( no affiliate). Do remember that there is no seam allowance included!
....and that was all! Till next time, happy sewing!
I think this is going to be the last summer dress. I can`t wait to start sewing for fall. The latest KnipMode is full of interesting patterns. But back to the dress above.
My YouTube review you can see here( including the pattern review, next projects, new fabrics and the action video)
This is one of their monthly "Jurken van Janice" ( Dresses from Janice). Every month dutch TV-personality and designer Janice presents a pattern in the KnipMode and every time there is also a video on YouTube where he shows more complicated parts of the pattern, how they are sewn up. I think that is a great idea and if he will use some more contrasting pattern/thread combination for the instructional video, it will be even better to understand some methods.
This dress has a lot of nice details. It has cut-on sleeves, gathers under the bust, shaped waistband, the skirt is a little gathered at the CF and CB. Also, it has a side seam invisible zipper, and it is really needed as the waist is pretty fitted and also a CF blind button placket closure, and this last part is covered in the video of the month (Dutch language only)
The fabric is polyester ( from my "fabric guy" @shauniosdorp on IG ), not slippery and with a nice drape. It pressed very nice but cutting was not easy. The rotary cutter didn`t want to cut it and the normal sheers were having a big time trouble to cut it also, it was like going away from it. Finally, I remembered the serrated shears I have and I tried those, PERFECT. I could not believe what a difference!
Because is a pretty loose model I did not make a muslin for this pattern. I only traced size 38 at the bust and 36 for neck, shoulders, and waist. I measured the waist to be sure that it will fit me and did a bit of paper pattern fitting to get the idea of how it was fitting. I traced the skirt size 38 and that got gathered in the waist 36. The pattern uses the same piece for the front and the back of the skirt, and to be honest I think my "back work " needs a bit more room, but it is ok .
Normally I make a swayback adjustment on almost all the patterns I am sewing and when I don`t do that I can notice the difference, even if it is only 2cm. In the back/side pictures you can see how the side seams tend to go forwards, I tried to pinch up horizontally at my back of the skirt, 2 cm, and that corrected immediately my swinging side seams and the bit of extra fabric I was having , but that I can`t fix in this dress anymore so it is something to remember.
I love it with the belt and a small belt loop it gets sewn at the CB, nice detail.
The instructions are good, I only changed the order a bit so that I could finish the inside better. The waistband is faced, so after I attached the waistband and it's facing to the bodice, I attached the skirt to the waistband ( the one facing the public), pressed the seam up and then I folded the seam allowance of the facing and stitched in the ditch from the outside of the garment to the skirt. I used my stitch in the ditch presser foot which works perfect, so easy!
I love the placket on the front, it would have been nice to know the required size of the buttons , there was only mentioned that you need three buttons. I think is important to know that, thinking that the placket is designed for particular size buttons. I know mine are too small but I like them and they fit the fabric ( and I found them very fast in my stash :))
...and the back with the little loop on the wide waistband!
This was a fun project, with all kind of nice details!
Next, I want to make a new Classic shirt but in combination with other pieces from the Recital shirt from Liesl and Co., a new denim jacket from the same KnipMode 6/2018 and sewing for my daughter is high on the list.
These days I am busy sewing from the enormous stash of sewing magazines I have, no punishment, so many nice patterns that I have on my list so nothing to complain.
Today`s make is another pattern from KnipMode magazine, dress pattern 1 from issue 6/2018.
I love the seams on the front of this dress!
In the magazine, the dress is made with a pencil skirt and short sleeves or with a more flared skirt and long sleeves. The dress is also fully lined.
I made the version with the pencil skirt, no lining and used the longer sleeve pattern and added 7cm plus hem allowance.
I traced size 36 for neck and shoulders and for the rest size 38. I made a test garment and based on that I made a few changes. I made a small video on how the muslin was fitting, if you would like to see it, you can find it here.
Fitting adjustments
Because I had a lot of room above my bust, the same as in my other Knipmode dress , I took again out 3cm horizontally, on the front bodice ( at approx. 7cm down from the center front neck) and back bodice and from the sleeves only 1.5cm to get them fit back on my adjusted bodice.
I also had to make a swayback adjustment, I had some fabric bunching at my back of the skirt and also the side seams on the skirt were swinging to the front. After taking 2cm out at the CB and blending to nothing to the side seam of the skirt, all these issues were gone.
The skirt was very long on me so I shortened it by 11cm.
Also based on my muslin I decided to take the side seams in by 1cm on each seam, now I am thinking that maybe 0.5cm per seam was better. The denim I used, has some stretch so it still is comfortable.
Sewing the dress
Usually, I don`t use sewing instructions but in case of patterns with special seams or, you know, different than usual two darts and a waist seam, I do use the instructions. In this case, the text was pretty clear to understand ( of course if you understand dutch :)) , but I even understand how the walking vent was supposed to be sewn, so that is a plus for KnipMode.
I choose denim and that called of course for topstitching! When I need to do topstitching, I am using an older machine( second hand bought a few years ago )only for that. It is so much faster when I don`t need to change my thread and needle and adjust the tension for this part of the sewing. I tested on a piece of my fashion fabric the color, stitch length and tension on that machine and that was set for topstitching only. If I had to do that only on one machine, I would sew as much as possible and then do the topstitching on those pieces and so on, to avoid all the changes after each seam.
My dress is unlined so I had to finish the neckline in another way, in this case with a bias band. Worked great!
In the magazine, they used a centered zipper but I used an invisible one, I wanted an exposed metal one, but sadly I could not find one to fit, in my stash.
Conclusions
I love the seams on the front of this dress! What I don`t love are the raglan sleeves! I sew just a couple of times raglan sleeves and maybe that is a reason why I can`t get them fit me right or why I don`t like them. I love inset sleeves and I think if this dress had inset sleeves it would have been perfect.
All in all, I like this dress, it was fun to sew and to topstitch all the seams. Pretty easy project and a nice dress for the fall.
I love denim dresses and I have a few in my wardrobe, you can see them here and here.
***
I also made a video review on YouTube, if you'd like to see that you can find it HERE
The action video is at the end of that video review, or here at minute 11.14 :) :
Next project
Next, I have another Knipmode pattern traced, from the same issue as above, 6/2018, this time dress 23 .
I have a few fabric options, you can see them in the video above and I think the dress is perfect for summer.
Finally, I had the time to make a new pattern from Patrones Magazine. There are so much of them on my "to sew" list but sadly the time is not enough to make them all...I do have fabric for the most :)).
This pattern is pattern 29 -Dress French Connection from Patrones 385.
If you would like to see a small review on Patrones in general and also the video review on the dress you can see that on my YouTube Chanel here .
In the magazine was only a flat picture of the dress, but after a bit of searching on the internet I found the actual dress, it was sold for €125. I was happy to find it because so I could see how the fit it was supposed to be. I traced (Spanish sizes, as they are in the magazine) size 38 for the shoulders, 42 for the bust and 40/42 for the waist and hips. One of the adjustments I almost always do is the shoulder length and after I measured the pattern I took 3cm out and after that, I made a muslin. I added 1 cm on each side seam to add a bit of extra room around the bust/hips/waist. Also, I took 1cm horizontally on front and back bodice, that raised the armhole by 1cm and also the waist got raised.
The dress has princess seams that are making the pockets also. The pattern has a drawstring in the waist but I just make a casing and add elastic. For the casing, I used a thinner fabric to reduce the bulk in the waist.
The back of the dress has also a pleat, they forgot to put that on the technical drawing but I found it on the back pattern piece if I did not make the pleat the yoke would have bee too big anyway.
The dress cost me €15 :) , the buttons are from an old shirt, and I think they are a perfect match.